
IITS Networking and Infrastructure
Utica University maintains a secure network for accessing the Internet. All users will need an access key to connect devices to Wi-Fi or will need to register their device for wired network connections. Choose an option from the following for more details. See our contact information at the bottom of this page if you need assistance.
Step 1:
In your Utica email, locate the message that contains your personal Wi-Fi key. This would have the subject "Login Credentials" and be from no-reply@extremecloudiq.com.
Step 2:
Open settings on your devices and connect to UticaU_Wi-Fi
Step 3:
Enter your Wi-Fi access key when prompted.
Step 4:
Open a web browser or an app that requires Internet to test that your connection works.
For Help
During business hours call the Help Desk at 315-792-3115, email helpdesk@utica.edu, or make a support ticket.
For residential rooms with an available network wall jack, you may connect a device with an ethernet cable (AKA Cat6 cable). Be aware that wired devices cannot communicate to your wireless devices, but they can obtain Internet access. You are not allowed to connect networking equipment such as routers or switches to the wired network.
To manually register you will need to know the MAC address of the device, follow this link for help with obtaining that information.
Note: Please note, device-to-device communication over the network is limited. Only devices using the same access key may communicate, and not all devices will be compatible with the University network. For example some cell phones and TVs may have trouble locating each other to "cast" video. Some smart home types devices may not be able to complete setup over the network.
Supported Devices
Below is a list of all devices allowed and known to work on the Utica University Network.
Computers running the following Operating Systems:
- Windows: Windows 11
- Apple: macOS 13 and newer
- Linux: Any workstation or home version is allowed
- Chrome OS: Any current version is allowed
Game Consoles:
- Microsoft: Xbox ONE snd Xbox Series
- SONY: PS4, PS5
- Nintendo: Switch
Mobile Devices:
- Apple: iPhone, iPad devices with iOS 16+
- Android: Version 12+ is recommended
Other Devices:
- Most Blu-ray DVD players
- Most Smart TVs
- Printers that connect directly to a computer by a USB port and have their wireless settings disabled
- Amazon Echo / Echo Dot / or similar.
Prohibited Devices
These devices will not work with the Utica University network, and in some instances usage of a device from this list can have a negative impact on the university wireless network.
Computers running the following Operating Systems:
- Generally any Operating System not expressly listed above. Contact the Help Desk if you're unsure.
- Any version listed as a Server Operating System (Windows Server 2008, Windows Server 2012, etc)
- Any version of a home use Operating System that is being used in any way to operate as a Server, such as file sharing, DHCP, or any other server functionality.
Game Consoles:
- Microsoft: Xbox
- SONY: PS2
- Nintendo: Wii and DS (any version)
Other Devices:
- Wired or Wireless Routers - these interfere with the Utica University network, and will be disabled.
- Network Printers, or any printer that attempts to be connected to an Ethernet port, such as an HP LaserJet Printer.
Note: This list is always under construction and will be changed to reflect when new devices are confirmed, and when manufacturers discontinue devices.
Recommended System Specifications
The Help Desk's recommended system specifications are the specs you should look at when deciding on a new computer.
At this time Utica University suggests avoiding the purchase of ChromeOS devices. These are essentially only a web browser and cannot run any special software. Windows computers will provide the highest level of software compatibility. Some academic programs require special software that will only operate on Windows based computers. We recommend you contact your academic advisor regarding this. Both Windows and Apple macOS recommendations are below.
PC Recommended System Hardware | |
| Operating System | Windows 11 |
| Processor Speed | 2.4 GHz dual-core equivalent or better |
| RAM | 8 GB |
| Drives | Enough hard drive space to store your programs and files, and an external drive for backup is recommended (or you can use Google Drive for backup in the cloud). |
| Networking | Ethernet and/or Wireless (5 GHz card or "dual band") |
| Software | Latest Google Chrome browser and/or Mozilla Firefox browser |
Mac Recommended System Hardware | |
| Operating System | Mac OS 14 "Sonoma" |
| Processor Speed | Intel Core i5 Processor |
| RAM | 8 GB |
| Drives | Enough hard drive space to store your programs and files, and an external drive - with the appropriate adapter - for backup is recommended (or you can use Google Drive for backup in the cloud). |
| Networking | All macs have wireless, you may wish to obtain an adapter to use ethernet. |
| Software | Latest Google Chrome browser and/or Mozilla Firefox browser |
Minimum Requirements
Utica University's Help Desk reserves the right to refuse service and support for any computer below these specifications.
NOTE: These are the new Minimum Requirements for Fall 2019. If you are purchasing a computer now, please make sure it meets at least these requirements. These requirements change each year based on support cycles of there respective manufactures.
PC Minimum System Requirements | |
| Operating System | Windows 11 |
| Processor Speed | 1.6 GHz or equivalent |
| RAM | 4 GB (8 GB preferred) |
| Drives | No minimum |
| Software | Latest Google Chrome browser and/or Mozilla Firefox browser |
Mac Minimum Requirements | |
| Operating System | Mac OS 13 "Ventura" Until Apple discontinues support status. |
| Processor Speed | Any |
| RAM | 4 GB (8 GB preferred) |
| Drives | No minimum |
| Software | Latest Google Chrome browser and/or Mozilla Firefox browser |
How to Turn Off Wireless on Your Devices
If you will not be connecting a wireless printer to the network and instead will use it with a USB cable, please disable the printer's Wi-Fi. Instructions are provided below to disable the wireless broadcasting on your device. This helps to ensure the stability and speed of your wireless Internet access and that of those nearby.
DISCLAIMER: The directions on this page are provided as is and have been tested to the best of Utica University's ability. Utica University is unable to test every device and adapt to every possible firmware or OS variation for each device. If these instructions for your device do not work for you, please consult the manufacturer of said device for further assistance in disabling your wireless service.
Device Type
HP
Most HP Printers
Use the menu to navigate to Setup, then Network, then Wireless Radio (on some models, this is towards the bottom of the scrollable menu). Turn the Wireless Radio OFF.
- From the Home screen on the product control panel, touch the Wireless button.
- Open the following menus:
- Wireless Menu
- Wireless Direct
- On/Off
- Touch the Off menu item. The product saves the setting and then returns the control panel to the Wireless Direct menu.
HP Photosmart d110
Some models may allow you to press the blue "wireless" button on the bottom front of the printer to turn the light out and service off. You may need to hold the button for 5 seconds to turn the light out.
If this is not successful, use the menu to navigate to Settings > Wireless > Wireless settings > Disable Wireless > OK
HP Photosmart c4780
- From the front panel, choose "Scan".
- Scroll up or down to find Networking.
- Select this, then turn off Wireless.
Canon
Canon MG3600 Serie
Follow the procedure below to disable the wireless LAN.
- Make sure machine is turned on.
- Press and hold Wi-Fi button and release it when ON lamp flashes.
- Press Black button twice and press Wi-Fi button.
- When the ON lamp changed from flashing to lit and the Wi-Fi lamp goes off, the wireless LAN is disabled.
Utica University Cable Television for on Campus Residential Students
Main Campus Residence Halls: Alumni, Bell, Boehlert, North, South, Tower
Utica University contacts with Spectrum Cable for TV services. You can use the links below to find instructions for the SpectrumU app on compatible devices. If you plan to use your TV for apps such as Netflix or Hulu and don't need cable TV, you simply need to connect your smart TV to UticaU_Wi-Fi.
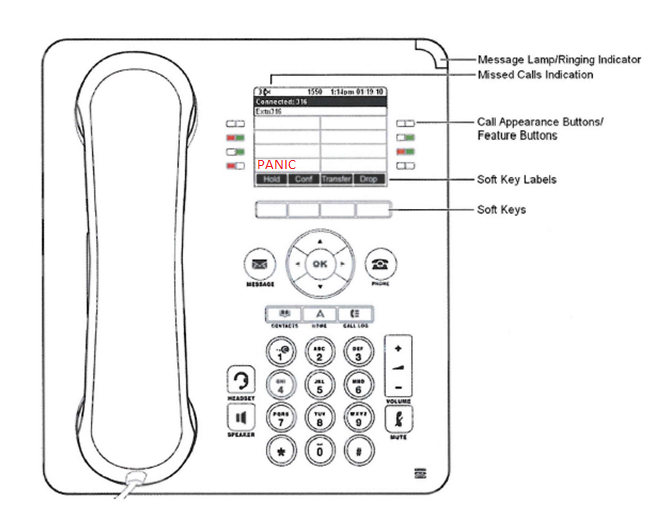
Telephone Keys and Features
Missed Call Indication: Indicates the number of missed calls, to clear, delete calls in missed call log.
Message Lamp/Ringing Indicator: On- Indicates new message in your voice mail box, flashing indicates a ringing call.
Display: Shows call information, details on system features and call appearance keys.
Call Appearance Keys: Allow you to handle multiple calls. Used to Make or Receive calls.
Feature Keys: Features and menus accessed by pressing these keys.
Soft Key Labels: Appear on the display to indicate features that can be activated by pressing the keys.
Soft Keys: Appear below the Soft Key labels on display and access features displayed on the label above them. These features change based on the current state of the phone. Ex: Active or idle calls.
- Answer: Answers a ringing call on hands free or answers a page call, turning it into a normal call.
- Callback: Set an automatic callback on the user set that you have called. When you next end a call, the telephone system will call you and when you answer, automatically make a call to the user.
- Complete: Completes the Transfer of a held call.
- Cancel: Cancels the completion of a Transfer and returns you to caller.
- Conference: Puts your current call on hold and presents dial tone to add another party to a conference
- Dir: Accesses the directories (personal and shared) allowing to dial from them.
- Drop: Ends the current call.
- Feature: If programmed, displays a list of available features, you can scroll through list and select applicable feature.
- Hold: Places a call on hold.
- Ignore: Quiets the ringer for current ringing calls. Calls will continue to flash until answered or goes to voice mail.
- Pickup: Answers a held call or answers the call of another user if programmed in a group.
- Redial: Displays a list of outgoing numbers from you call log allowing you to dial from that list.
- Transfer: Puts your current call on hold and presents dial tone so you can transfer the call to another extension.
- To VM: Sends a ringing call to voice mail.
Navigation Keys: Scrolls through Call Appearance, Feature Keys, menus, call logs, and speed dial lists.
OK Key: Confirms menu choices.
Phone: Used to exit any menu, or return display to main screen.
Message Key: Access your mailbox.
Contacts: Used to display personal and shared directories.
Home: Used to access a menu for phone settings and information.
History: Displays a record of most recent answered, missed, and outgoing calls. The key is illuminated when you have new missed calls.
Headset: Switches calls from handset to headset. Key is lit when headset is active.
Speaker: Used to make or answer any call without lifting the handset. Key is lit when active.
Volume Keys: Controls Ringer, Speaker, and Incoming voice levels over handset and headset
Mute Key: Turns the microphone off and on when you are on a call. Lamp is lit when in use and caller cannot hear you.
Call Processing
To Answer Incoming Call: Phone rings- Indicator flashes slow. Lift handset or press Speaker or Headset.
To Answer Second Call: Press Call Appearance Key of new call (first call automatically holds).
To Place a Call: Lift Handset, press Speaker or press Headset.
Internal: Enter the extension.
External: Press 9 then the number.
External: Press 9 then the number.
To Place a Second Call: Press available Appearance key. Enter 9 and number.
Speaker: Press to make or answer any call without lifting handset.
To switch to speaker from headset/handset: Press the Speaker key and replace handset in cradle.
To resume privacy: Lift Handset or press Headset.
To end speakerphone call: Press Speaker key.
To resume privacy: Lift Handset or press Headset.
To end speakerphone call: Press Speaker key.
Mute: Turns off your microphone (Speaker, Handset and Headset) to allow you to speak privately.
To use: Press Mute key. When Mute key is lit, you can speak privately.
To resume conversation: Press Mute key again.
Hold: Press Hold softkey. Indicator lamp will flash rapidly.
To return to call: Highlight Appearance Key with the fast flashing lamp or press the Up key followed by OK.
Automatic Hold: When you select another Call Appearance key, or use certain Features, the line that you are already speaking on will be placed on hold.
Additional Features
Transfer: Allows you to connect your call to someone else. Press Transfer softkey then enter the extension number.
Additional Features
Transfer: Allows you to connect your call to someone else. Press Transfer softkey then enter the extension number.
Blind Transfer: Press Complete softkey.
Announced: Wait for party to answer and speak privately. To complete the transfer, press the Complete softkey.
Announced: Wait for party to answer and speak privately. To complete the transfer, press the Complete softkey.
Transfer to Voice Mail: Sends a caller directly to voice mail without the phone to ringing.
Press the Transfer softkey (Call is automatically held)
Enter # sign and the Extension number
Press Complete softkey
Enter # sign and the Extension number
Press Complete softkey
Conference: Allows multi-call Conferencing (With call on line)
Press Conference softkey (First call automatically holds, you hear dial tone)
Enter second number (wait for answer)
Press Conference softkey (all parties are connected)
Enter second number (wait for answer)
Press Conference softkey (all parties are connected)
- To add additional parties, repeat the steps above.
- To drop yourself, hang up.
- To drop a party member press: Details, scroll to the party member's name then press the Drop softkey.
If called party does not answer: Press Call Appearance key of the held line.
Do Not Disturb: Stops ALL tones and ringing.
Call Forwarding: Programs your phone to ring at another Extension or External number.
Redial: displays the last 10 numbers dialed.
Call Forwarding: Programs your phone to ring at another Extension or External number.
Panic: Dials Campus Security from any telephone. Just press the Panic key.
Redial: displays the last 10 numbers dialed.
To Use: Press Redial softkey
Display shows last numbered dialed
Use Up/Down arrow keys to display additional numbers
Press Details softkey
Use Up/Down arrow keys to scroll through details about call
Press Call softkey
Use Up/Down arrow keys to display additional numbers
Press Details softkey
Use Up/Down arrow keys to scroll through details about call
Press Call softkey
To Redial last number dialed: Press Redial twice or press Redial then press the Call softkey.
First Time Mailbox Setup
To Create Your Password (REQUIRED):
- Press Message Key on your phone or dial *17
- Enter mailbox number (your extension) and press #
- Your password is initially "blank". When prompted for password simply press #
- Enter a new 6 digit voicemail password of your choosing and press #
- Note that this cannot be sequential or repeating numbers such as 111111 or 123456.
- Enter the new password again and press #
Stay on the Line, you'll be prompted to record your name:
- Speak your name
- Press 1
- Press #
- Press 1
To Record and Activate your Greetings:
- Press 3 to access greeting menu
- Press 1
- Enter Greeting Number (1-5, 9)
- 1 = All Calls (recommended)
- 2 = Internal (optional)
- 3 = External (optional)
- 4 = Busy (optional)
- 5 = No Reply (optional)
- 9 = Temporary (recommended for when you'll be away)
- Begin speaking after tone
- Press 1 to end recording
- Press 23 to listen
- If you don't like the greeting press *3 to delete
- Press 1 to rerecord
- Press # to approve your greeting
Access Your Mailbox
Log In To Mailbox:
From Desk:
- Press Message key
- Press #
- Enter your voicemail password
- Press #
From Another Location:
- Dial your full phone number
- Press *7 when you hear your voicemail greeting
- Enter you mailbox number (extension) and press #
- Enter your voicemail password
- Press #
General Information
Mailbox Number: Your Extension is your mailbox number
Password: No password is initially provided. You will be forced to create one the first time you log in. Your new password must be between 6 and 12 numbers and it must be secure. (You cannot use 1234, your extension or repeated numbers like 1111).
Recorded Name: Your name is played as a confirmation when you log in to your mailbox. It is also used for other system announcements including the company directory search feature. You'll be prompted to set this the first time you access the mailbox.
Greetings: By default callers who reach your mailbox hear the system greeting: "Your call is being answered by IP Office (Name) is not available. To leave a message, wait for the tone". You can replace this greeting with one that you record. You can record a library of up to 9 different personal greetings. If you do not record a greeting for a certain type, it will not be used.
Greeting Types
All Call: Plays to all callers and overrides other greeting types except temporary. This is generally what people use for everyday use.
Internal: Plays to callers from inside your organization (optional).
External: Plays to callers outside your organization (optional).
Busy: Plays when all extensions are busy (optional).
No Reply: Plays when you do not answer (optional).
Default: System greeting.
Temporary: This will play when you set it to override the others. It is useful to set for when you'll be on vacation or otherwise not planning on answering your phone. When activating the temporary greeting you'll be prompted for a number of days you wish to use it, after which the system will turn it off automatically.
Navigating the System:
Log In: You must log in to retrieve and send messages, change password, record name and greetings.
Help: To receive help at any time, press *H or *4.
Commands: Commands are activated by pressing Numbers and Signs on the dial pad.
Prompts: A synthesized voice summarizes your Mailbox, gives available commands and options.
Contact Us
Integrated Information Technology Services (IITS)
Integrated Information Technology Services (IITS)
(315) 792-3115
I would like to see logins and resources for:
For a general list of frequently used logins, you can also visit our logins page.